













VW Touareg 7L Digital Cluster Installation 2003–2010: 37 Real-Photo Steps
VW Touareg 7L Digital Cluster Installation 2003–2010: 37 Real-Photo Steps
VW Touareg 7L digital cluster installation para 2003–2010 models is documented here from iKAGOO's own real installation photo sequence. The guide follows the photographed order from dashboard trim removal and cluster mounting through original-mainboard retention, passenger-side glovebox routing and final checks.
The most important technical point in this route is visible in the photos themselves: the original instrument mainboard is retained, mounted on a support and connected again in the passenger-side glovebox area.
You remove the original cluster surround and brackets, connect and mount the new LCD cluster, route the extension cable to the passenger side, retain the original instrument mainboard, reconnect that board in the glovebox area, then test the supported vehicle data and warning functions before closing the dashboard.
What evidence is this VW Touareg 7L digital cluster installation guide based on?
Resposta direta: this guide is based on the actual iKAGOO Touareg installation sequence: one cover plus 36 step photos, with the original 37-step order preserved. The images directly document trim and bracket removal, new-cluster mounting, extension-cable routing, original-mainboard retention and glovebox placement.
The same evidence also defines the boundary of the article. The supported product scope is VW Touareg 7L 2003–2010, but the photos do not prove that every vehicle within that year range has an identical internal configuration, and they do not show a coding procedure, so neither point is presented as a universal fact.
VW / Volkswagen Touareg 7L, model years 2003–2010. Exact fitment still requires the original cluster and dashboard configuration to match the supplied route.
37-step source sequence from the actual iKAGOO installation material, with each uploaded branded photo kept against its original step.
The article explains how the driver-side cluster work connects to the later original-board relocation instead of treating every photo as an isolated caption.
Fitment is confirmed from the original cluster, dashboard opening, platform/configuration and LHD/RHD details—not from the year alone.
How do you remove the cluster surround on a VW Touareg 7L 2003–2010?
Resposta direta: remove the steering-wheel-area trim first, then the side and upper trim, followed by the exposed screws and the two instrument mounting brackets. Step 13 is the point to compare the exposed dashboard opening with the iKAGOO photo sequence before connecting the new cluster.
Record the original dashboard before disassembly
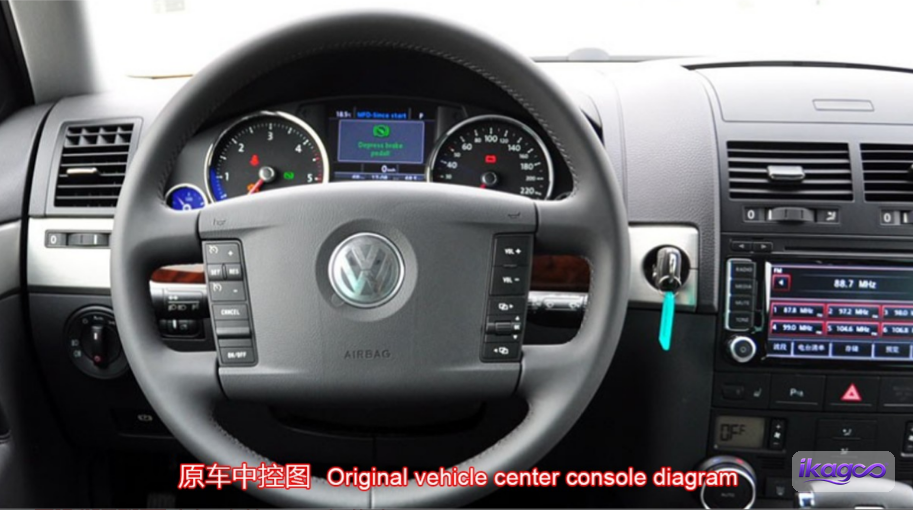
Start with the car exactly as it arrived. The first photo is the reference for the original cluster position, the surrounding trim and the overall dashboard fit. Take your own photo at this point as well; it gives you something concrete to compare against when the new cluster and trim are back in place.
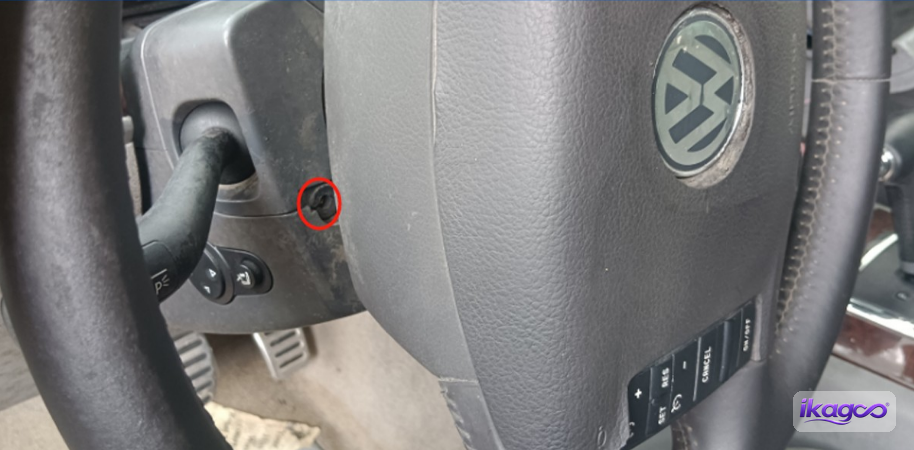
Remove the steering-wheel-area screw
Remove the screw shown around the steering-wheel area. This is the first fastening point in the photographed sequence and opens the way to the trim that comes off next.
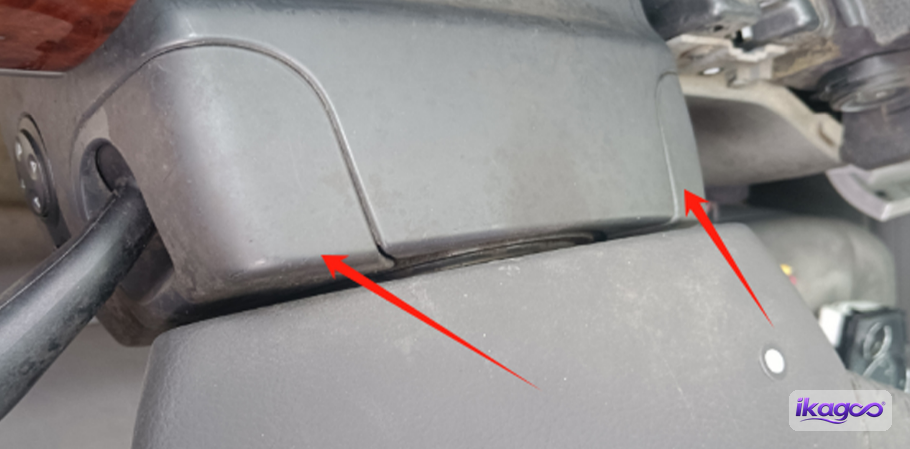
Release the steering-wheel trim piece
After the screw is out, gently release the trim piece shown around the steering-wheel area. Work from the visible seam and free the piece progressively rather than trying to pull the whole section off in one movement.
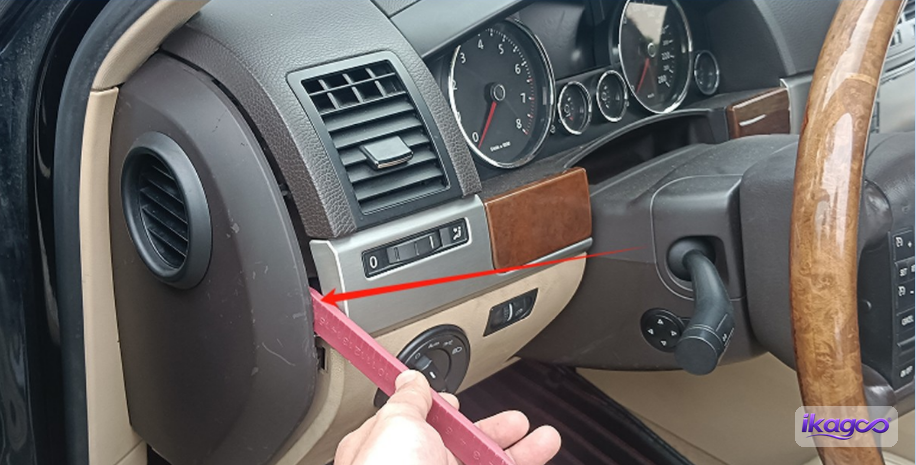
Open the side trim beside the cluster
Move to the side of the instrument area and release the side trim shown in the photo. This begins separating the trim pieces that lock the cluster surround into the dashboard.
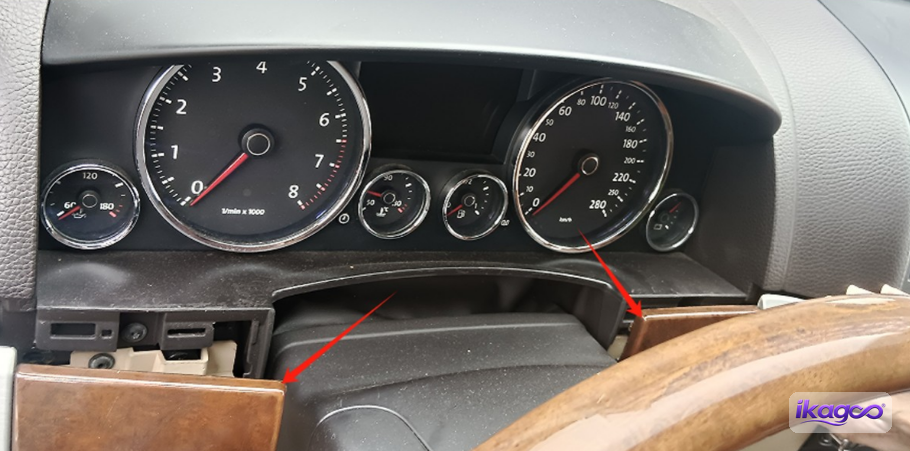
Release the trim on both sides
Continue across both sides of the cluster surround. Once the side pieces are loose, the upper trim can be removed without fighting against panels that are still clipped together.
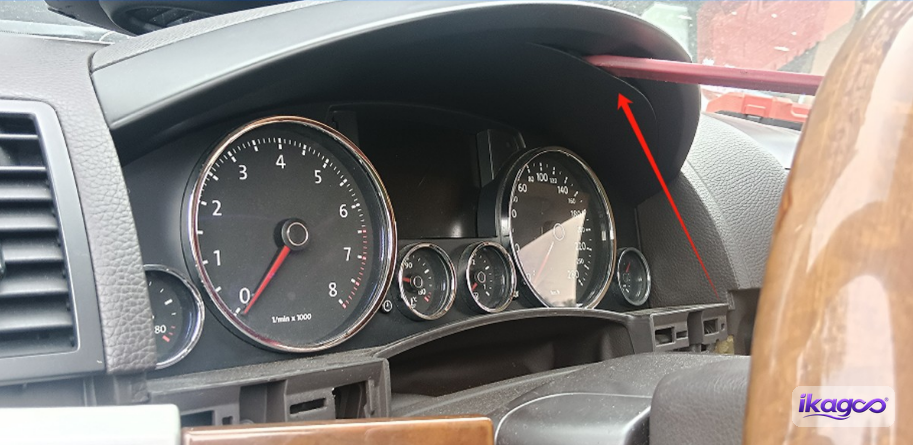
Lift off the upper decorative trim
Release the upper decorative piece above the cluster. Removing this panel exposes the next fastening points in the installation sequence.
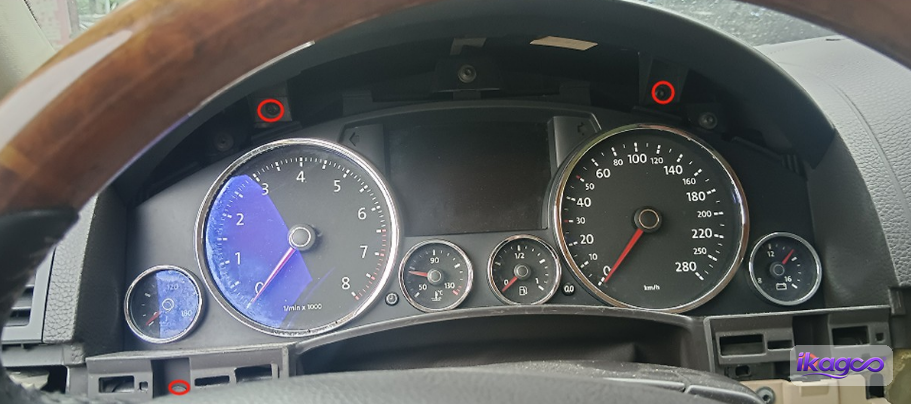
Remove the exposed screws
With the upper trim out of the way, remove the screws that are now visible. These fasteners hold the surrounding structure that must come off before the cluster mounting brackets can be reached.
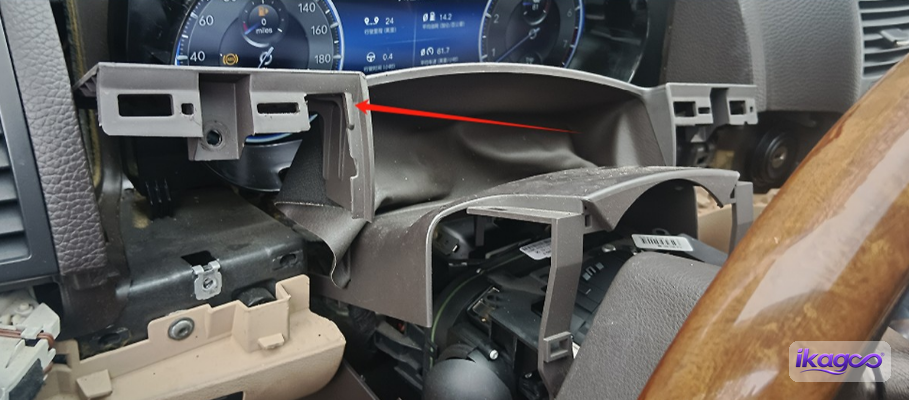
Release the remaining side trim
The next photo returns to the side trim. Release the remaining pieces on both sides and keep the trim supported as it comes away from the dashboard.
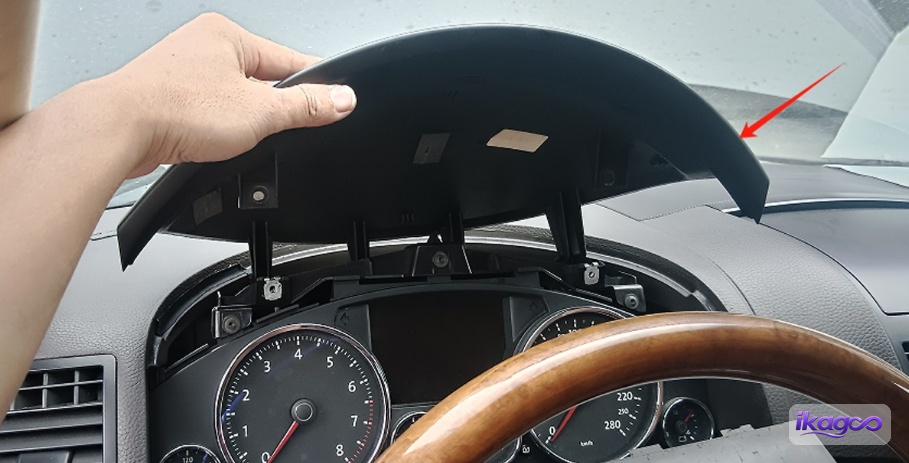
Remove the upper trim section around the instrument area
Now remove the remaining upper trim section shown in the photo. At this point the cluster mounting structure begins to become fully visible.
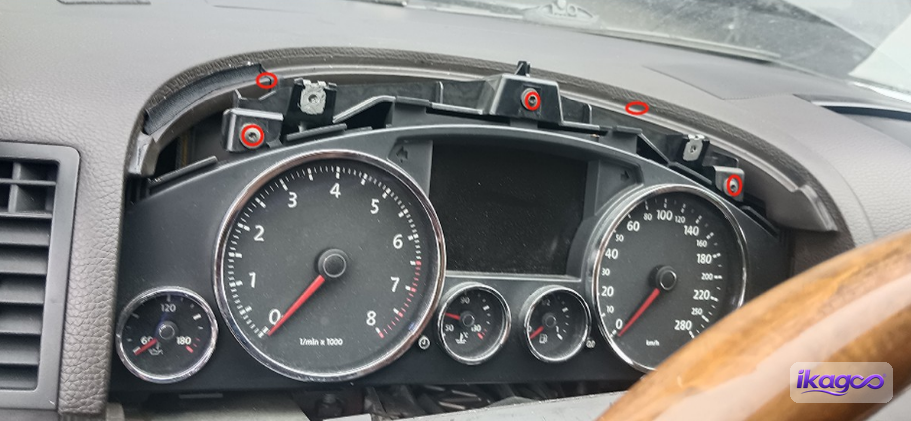
Remove the instrument mounting-bracket screws
Remove the screws holding the instrument mounting bracket. This is the point where the job changes from decorative-trim removal to removing the structure that physically locates the cluster.
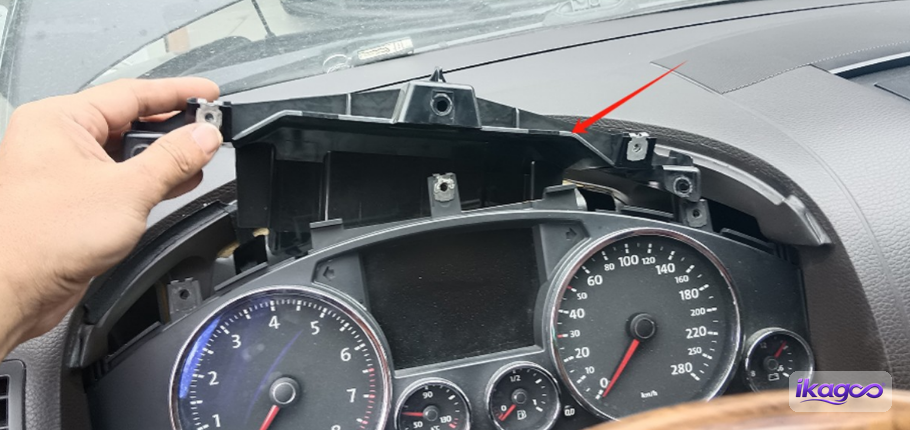
Lift out the first mounting bracket
With its screws removed, take out the first bracket shown in the sequence. Keep it together with its fasteners because it is part of the original mounting reference.
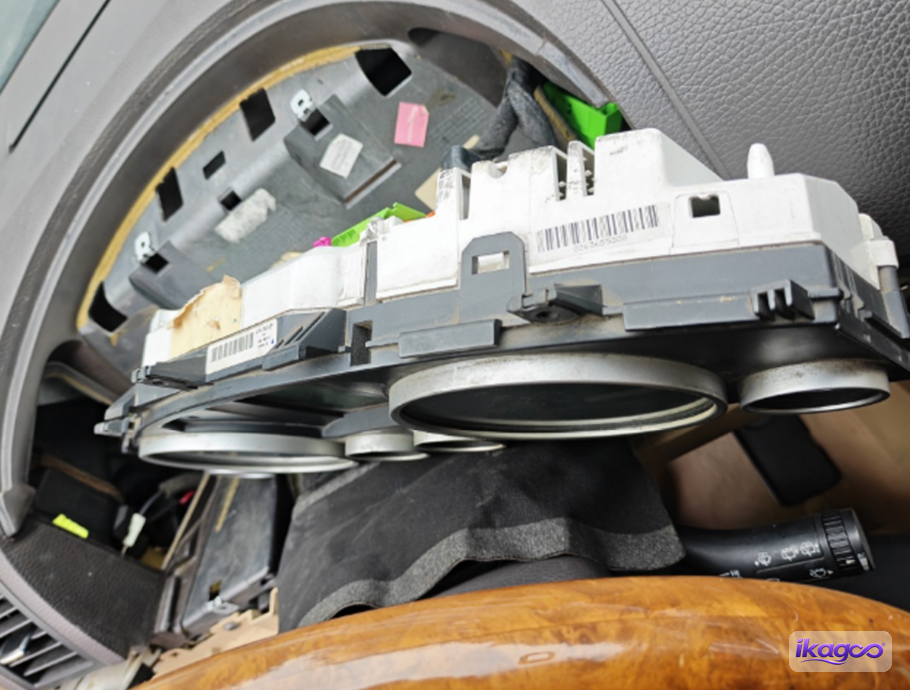
Remove the second bracket
Remove the second bracket in the same area. Once both bracket pieces are out, the dashboard opening is clear enough to compare with the new cluster route.
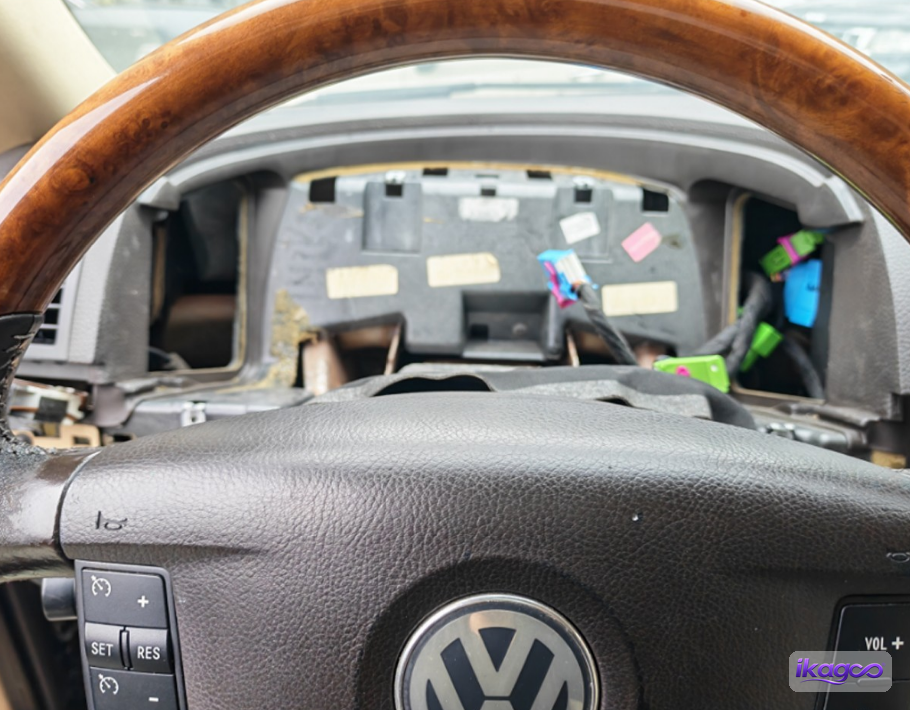
Compare the exposed opening before connecting the new cluster
Pause here and compare your dashboard opening with the photo. This is the most useful point to catch a fitment mismatch before any new hardware is connected or pushed into place.
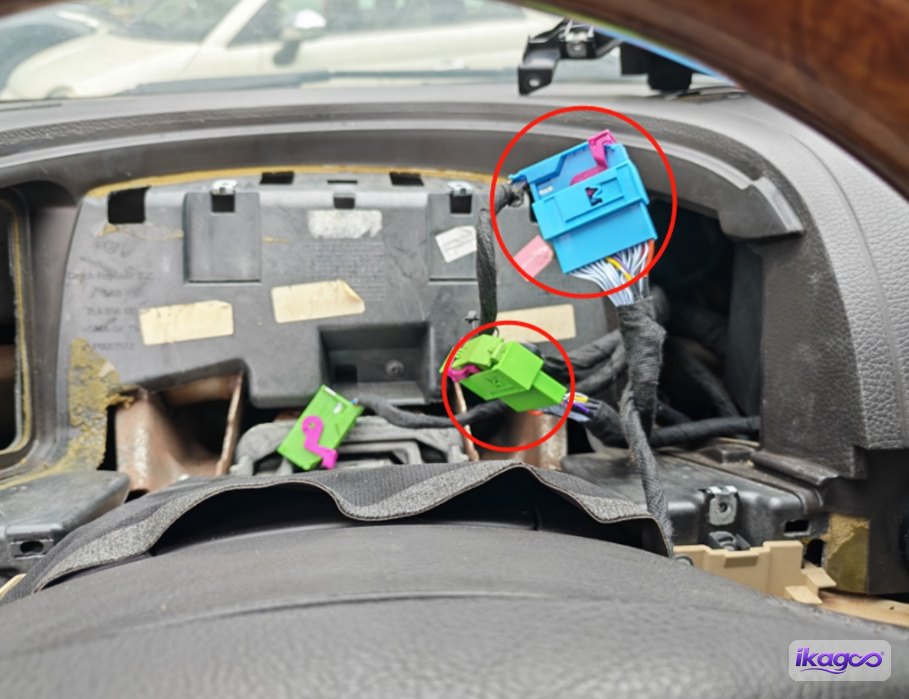
How is the iKAGOO digital cluster connected in a VW Touareg 7L 2003–2010?
Resposta direta: connect the main power plug and the thin cluster plug, align both lower mounting feet with the original screw posts, place the cluster into the opening, route the extension cable toward the glovebox, then secure the cluster and refit the trim. Connector match and cable routing should be checked before the unit is enclosed.
Connect the main power cable
Connect the main power cable to the new LCD cluster as shown. The connector should match the supplied socket and seat in the intended orientation.
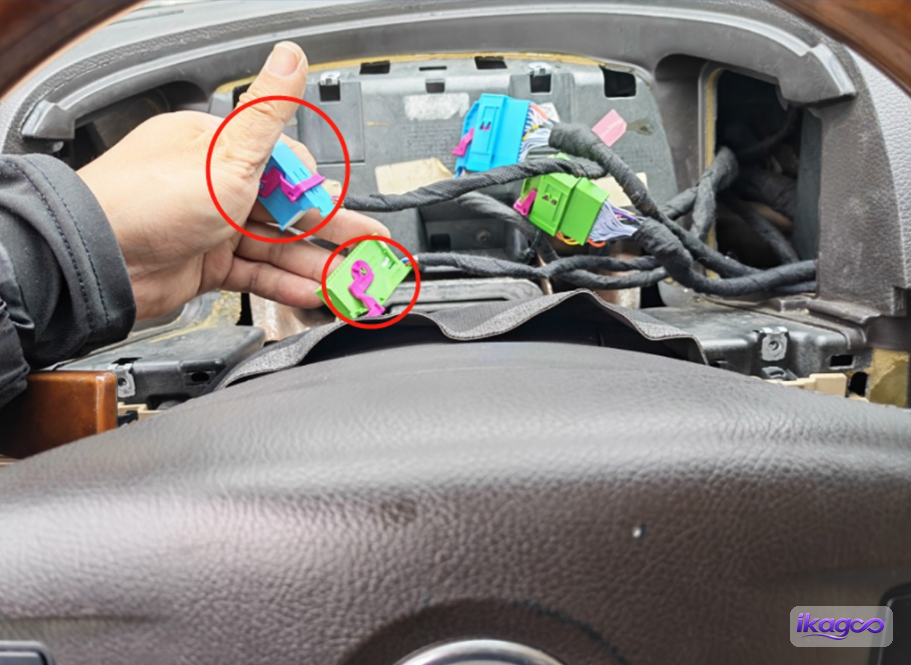
Connect the thin plug to the LCD cluster
Insert the thin-wire plug shown in the photo into the matching socket on the LCD cluster. Make sure it is fully seated before the cluster is moved toward the dashboard opening.
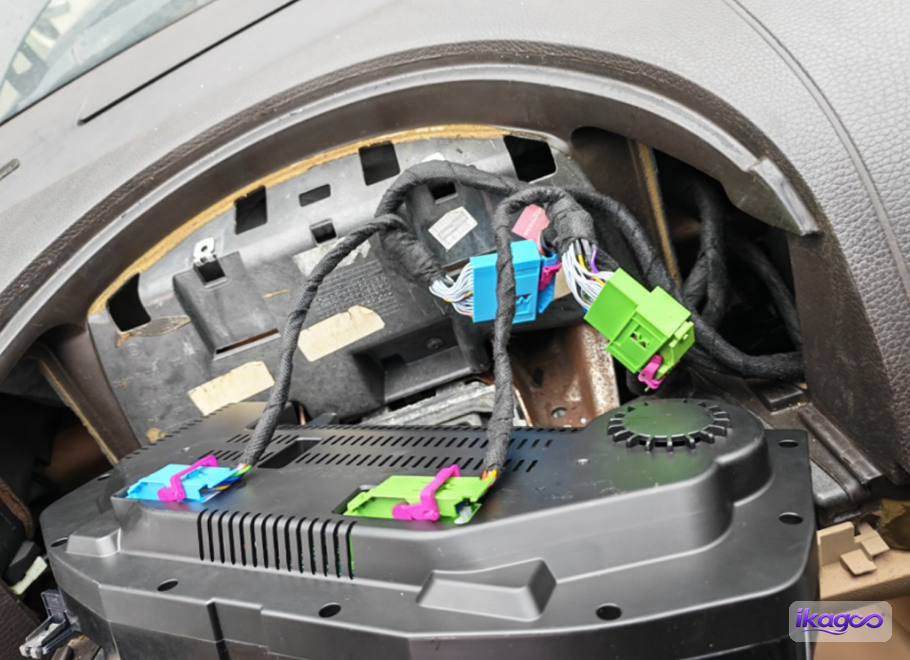
Check both cluster connections before mounting
Before the display goes into the dash, look at the completed connections shown in the photo. This is the last easy opportunity to correct a half-seated plug before the back of the cluster becomes difficult to see.
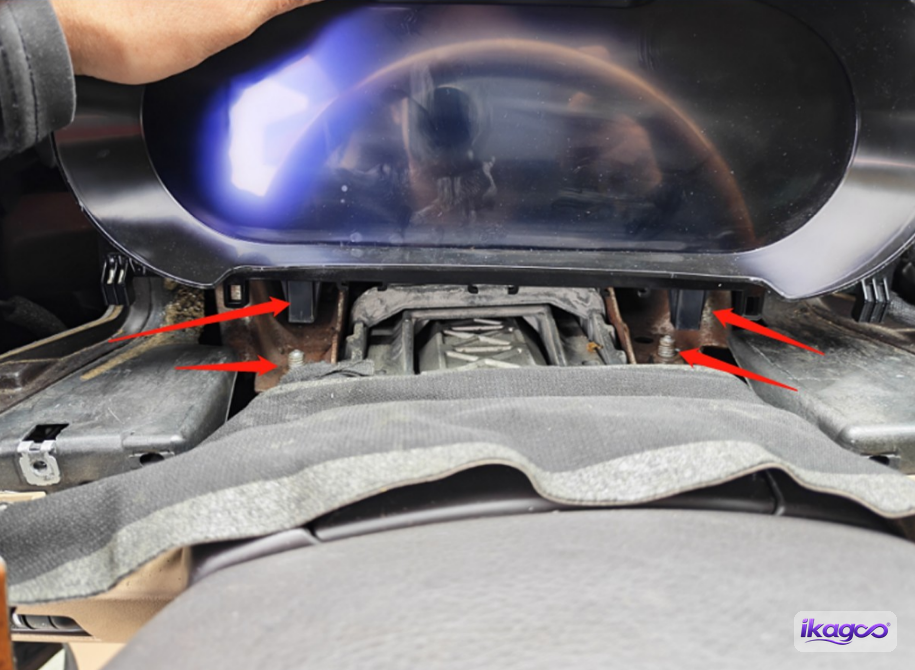
Align the two lower feet with the original screw posts
Line up the two lower mounting feet of the new LCD cluster with the original screw posts shown in the photo. Both sides should meet the factory mounting points before any screw is tightened.
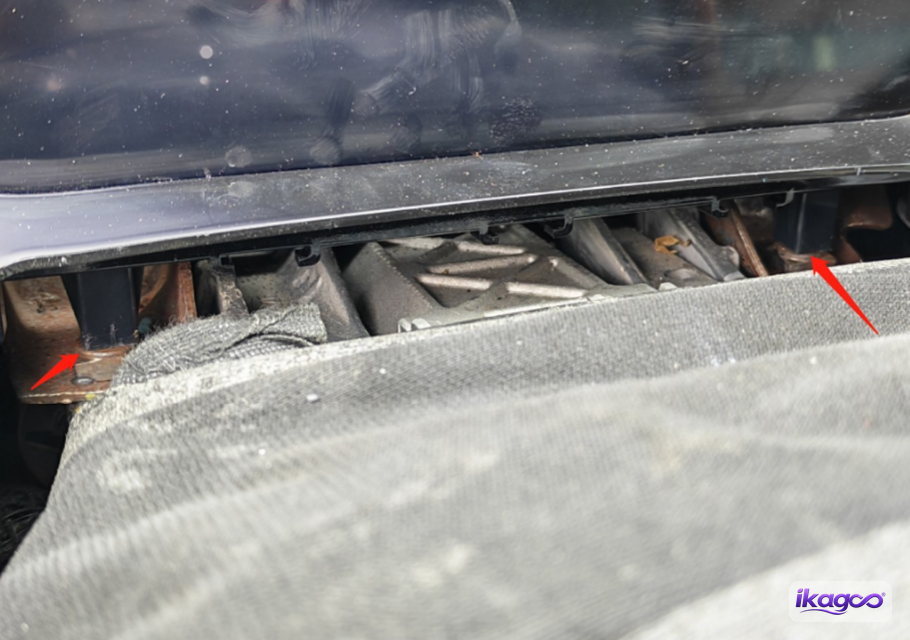
Confirm the cluster is sitting square
Hold the cluster in its aligned position and check the gap around the housing. The unit should sit naturally in the opening rather than being pulled into shape by the screws.
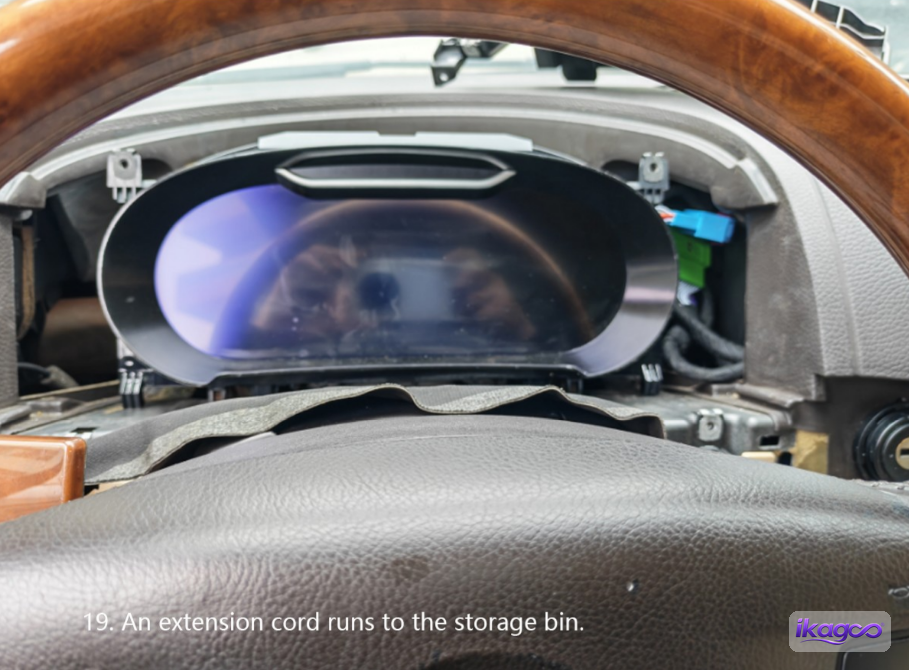
Place the LCD cluster into position
Move the cluster into its final dashboard position. Keep the wiring behind the unit free as the housing moves inward so the front fit is not achieved at the expense of a trapped cable behind it.
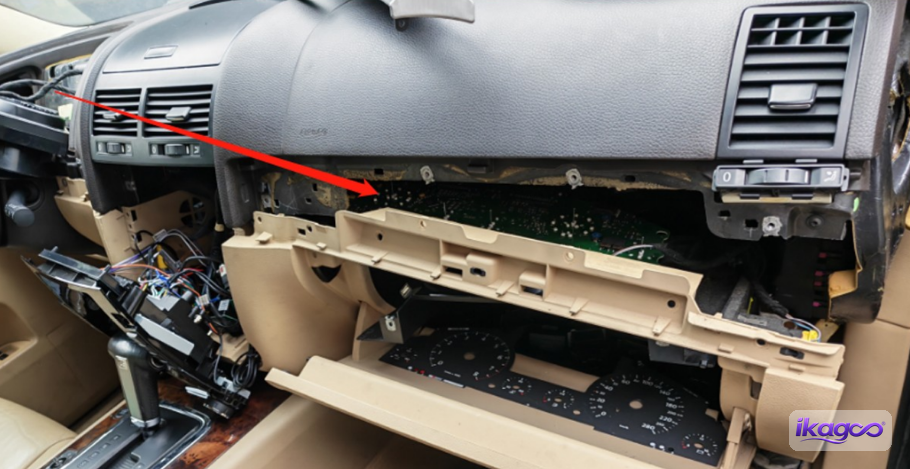
Route the extension cable toward the passenger glovebox
The source sequence now introduces the extension cable that runs from the cluster area toward the passenger-side glovebox. Route it along the documented path and leave enough length for the retained original mainboard that is connected later.
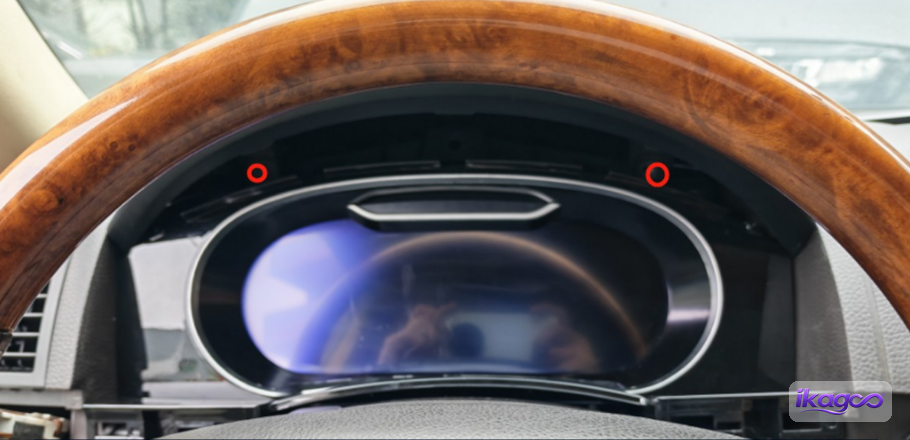
Secure the new cluster
Once the cluster is aligned and the extension cable has a clear route, install the mounting screws. Tighten the unit in the position it already sits correctly rather than using the screws to pull the housing into alignment.
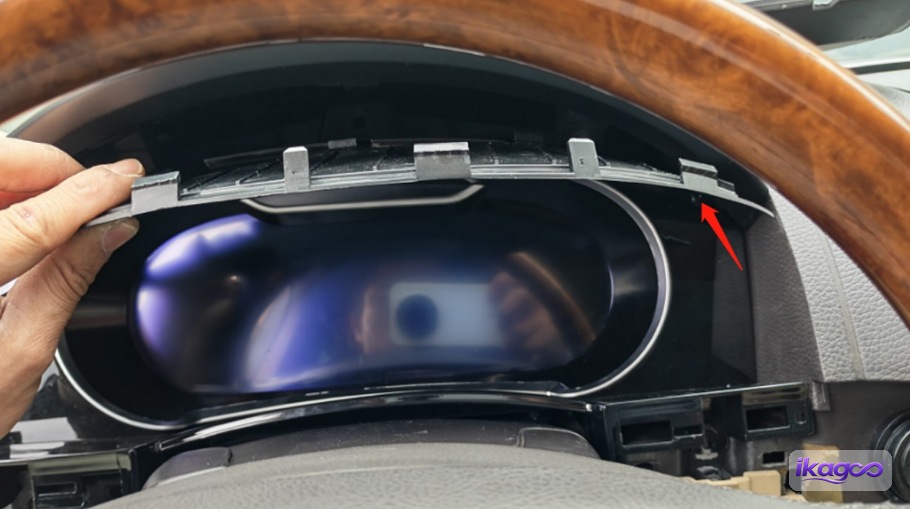
Fit the LCD cluster trim
Clip the new cluster trim into place around the display. Work around the edge and confirm that the trim sits evenly with the dashboard opening.
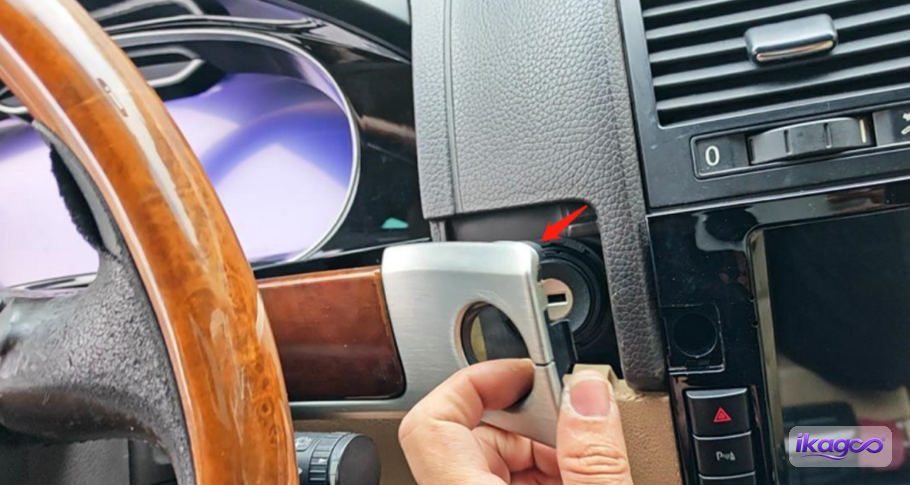
Refit the original side trim
Return the original trim pieces to both sides of the cluster. This is the first visual check that the new assembly is sitting where the original dashboard expects it to sit.
Why does the VW Touareg 7L 2003–2010 digital cluster retrofit retain the original mainboard?
Resposta direta: this documented iKAGOO route keeps the original Touareg instrument mainboard instead of discarding the complete factory cluster electronics. The source photos show the original cluster being opened, the board being removed and then secured to a supplied metal support.
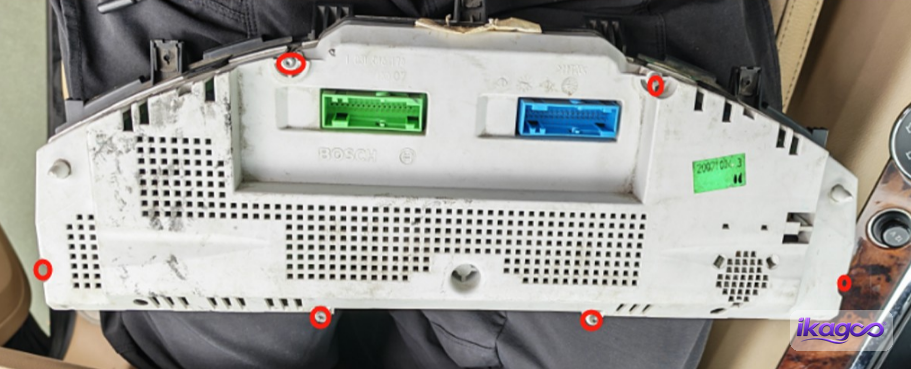
Remove the screw from the original instrument cluster
The job now moves to the original instrument cluster itself. Remove the screw shown in the photo so the original housing can be opened. From this point onward, the original cluster is being disassembled because part of its electronics will remain in the vehicle.
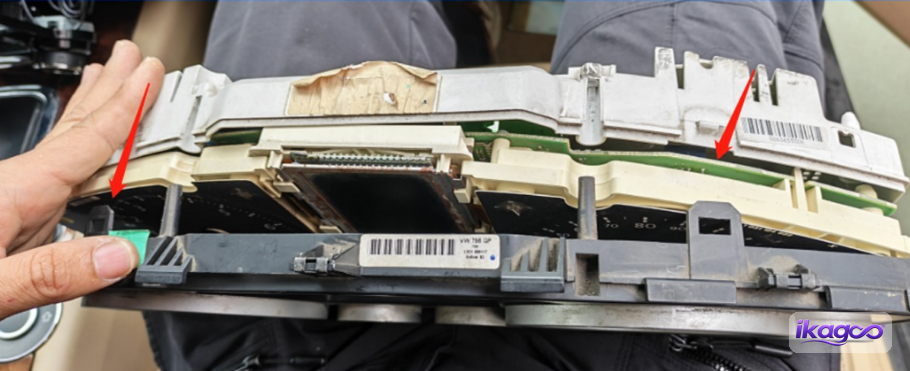
Abra a caixa original do painel de instrumentos
Carefully separate the original instrument housing. The goal is not simply to dismantle the old cluster; it is to reach the electronics that the photographed retrofit route keeps and relocates.
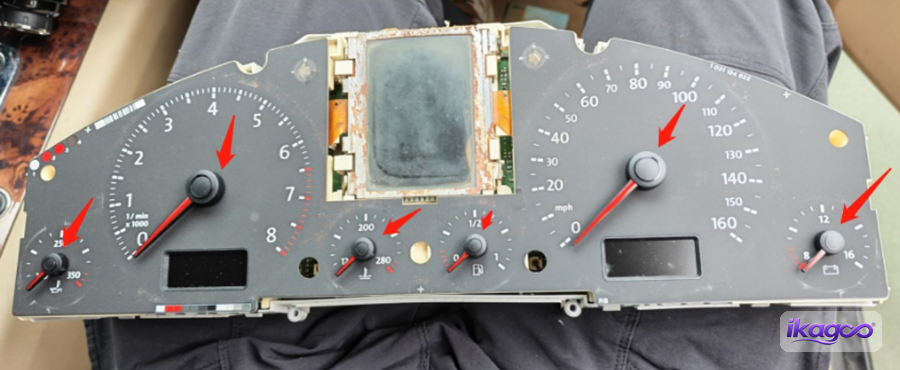
Remove the original pointers
Lift off the pointers shown in the source photo so the cluster can be opened further. Keep the removed original parts together while the board-transfer stage is completed.
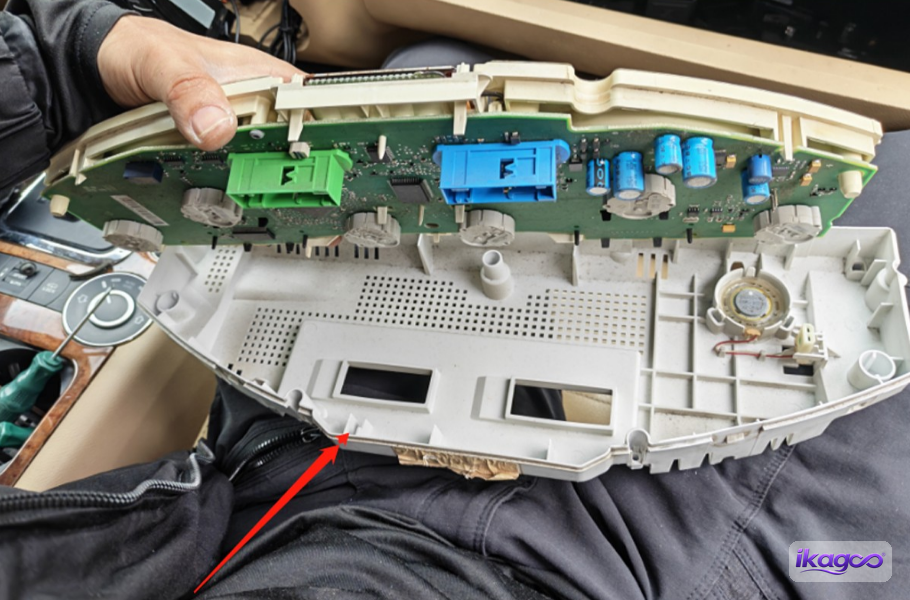
Release the lower housing
Open the lower housing shown in the photo. This exposes the internal connection and the original instrument mainboard used in the next steps.
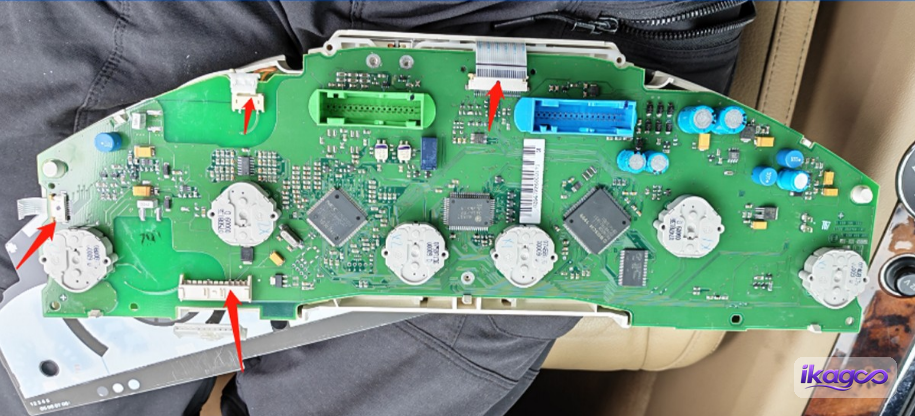
Disconnect the internal instrument cable
Unplug the internal cable shown inside the original cluster. Once this connection is released, the mainboard can be separated from the original housing.
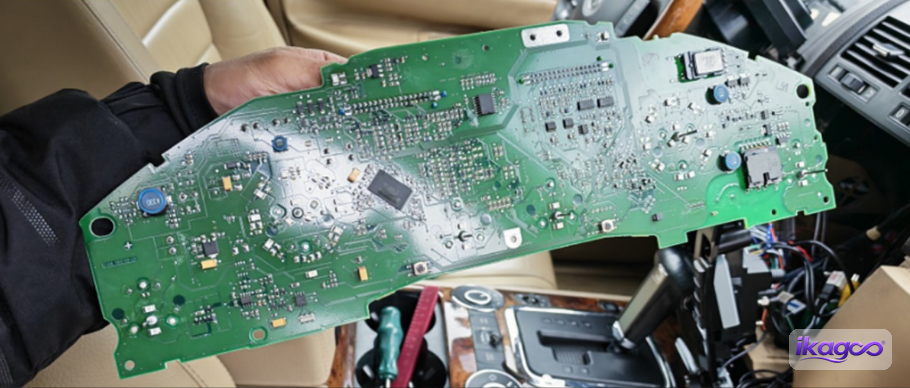
Retain the original instrument mainboard
This is the defining technical step in this installation route: the original Touareg instrument mainboard is kept. The source sequence does not discard it; the board continues into the final installation.
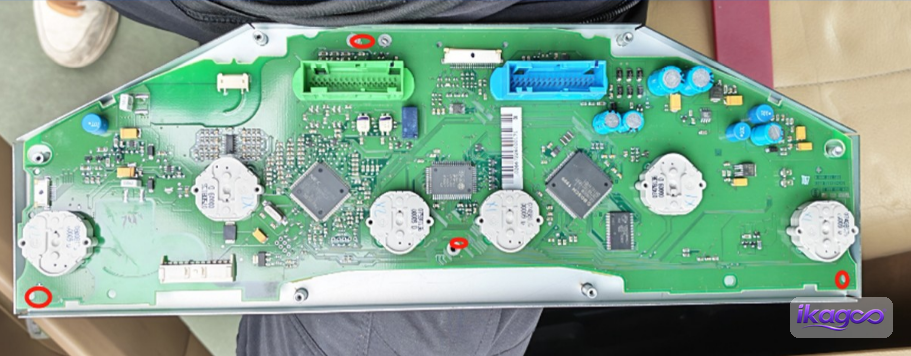
Mount the retained mainboard on the metal support
Position the original mainboard on the supplied metal support exactly as shown in the photo. The support gives the board a stable mounting method after it leaves the original instrument housing.
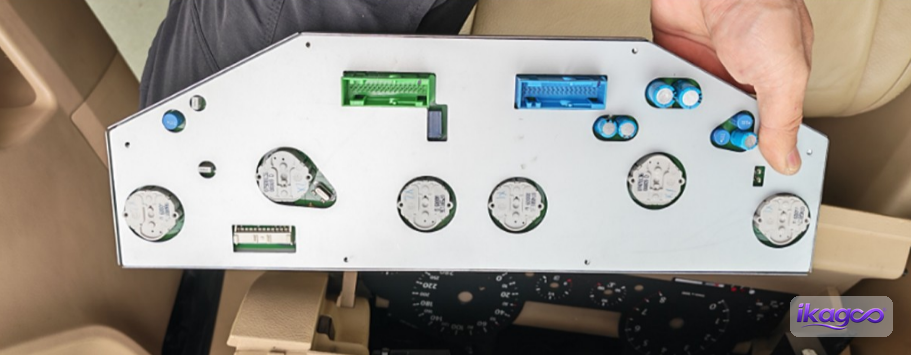
Confirm the original mainboard is secured
Check the finished board mounting before moving it to the passenger side. The board should remain fixed to the support with its connection point available for the wiring shown later.
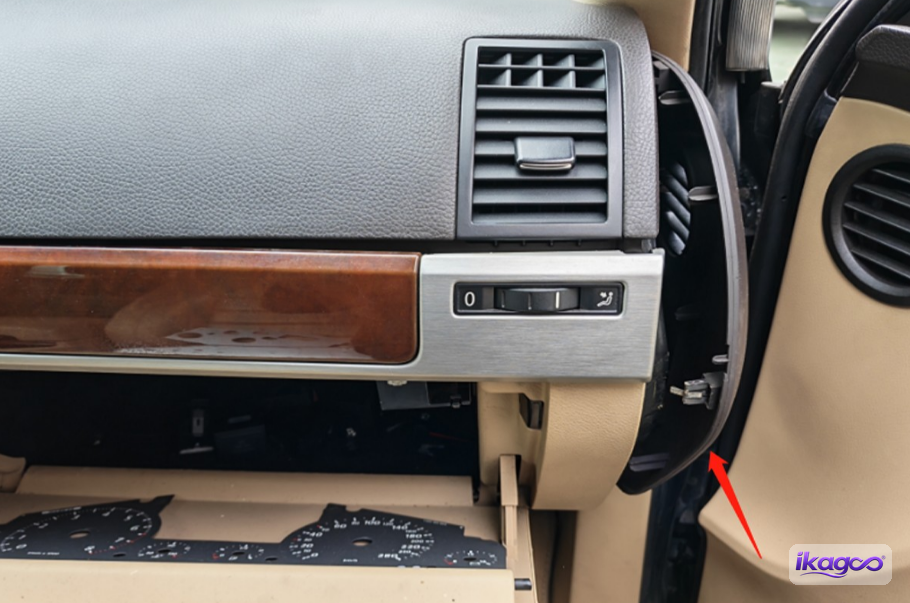
Where does the original VW Touareg 7L 2003–2010 mainboard go after the retrofit?
Resposta direta: the retained original instrument mainboard is routed to the passenger-side glovebox area. The glovebox trim is opened, the board wiring is reconnected, and the board remains secured there as part of the final retrofit route.
Open the passenger-side panel
Move to the passenger side and release the side panel beside the glovebox. This begins the access path for the extension cable and the retained original mainboard.
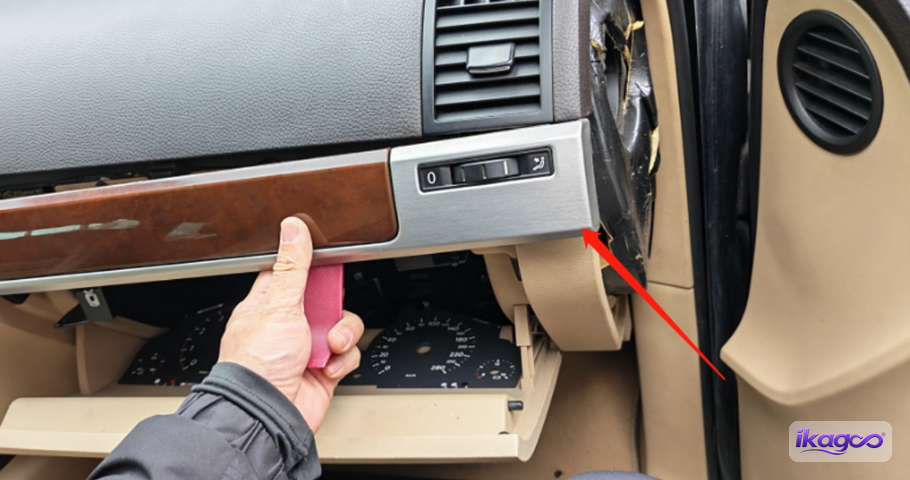
Release the glovebox-side trim
Remove the additional trim piece shown around the glovebox area. Only the panels needed to reach the storage compartment and board location are being opened.
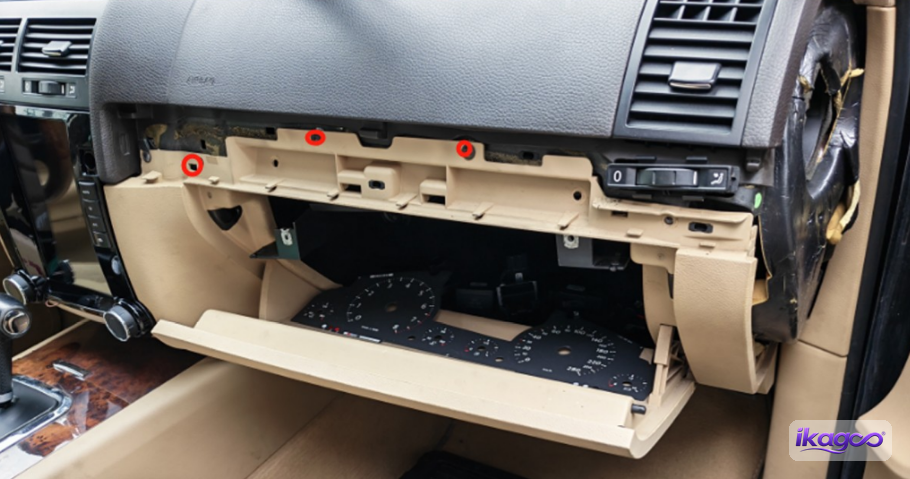
Remove the glovebox screws
Remove the screws holding the glovebox/storage compartment. This creates the working space needed to connect and position the retained original instrument mainboard.
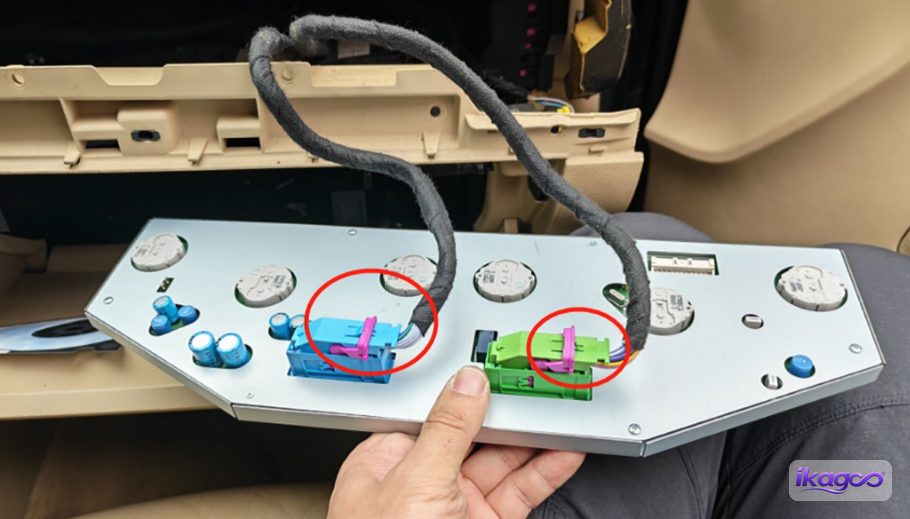
Reconnect the retained original mainboard
Connect the wiring to the retained original mainboard as shown. This connection completes the route that began when the extension cable was pulled across from the new cluster in Step 20.
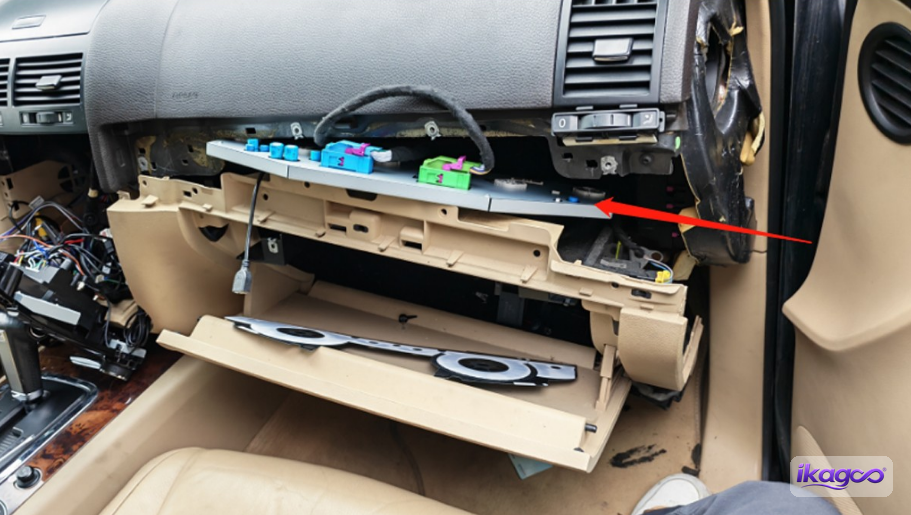
Place the retained mainboard in the glovebox area
Position the retained original mainboard in the passenger-side glovebox area following the photographed arrangement. Before the glovebox is closed, confirm that the board remains fixed to its support and the wiring has enough room to stay connected without being pinched.
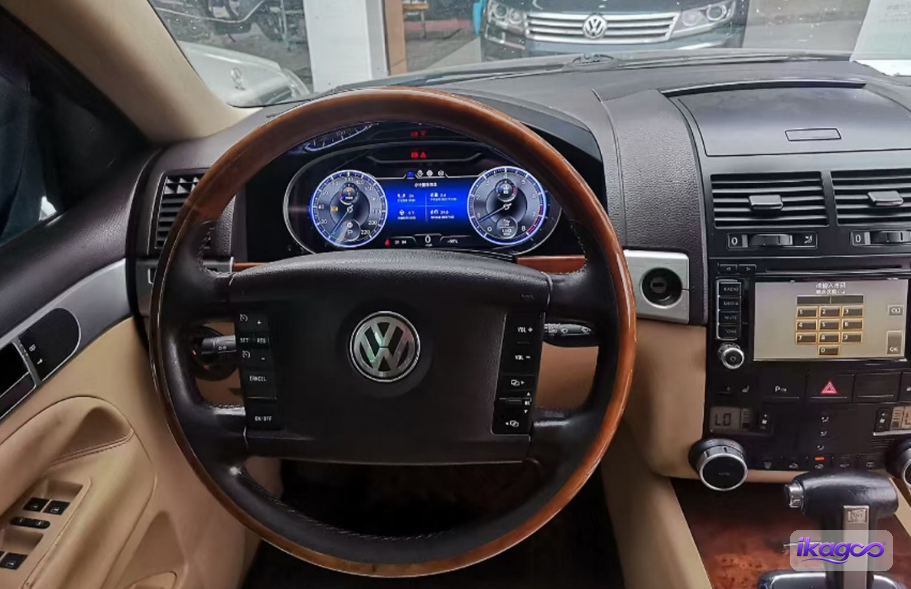
Power on and verify the installation before final closure
The original source describes the final step as the finished installation result, but the extracted step set does not contain a separate Step 37 image. Before normal use, power the vehicle on and verify the functions that apply to the confirmed cluster version.
What should you test after a VW Touareg 7L 2003–2010 digital cluster installation?
Resposta direta: before closing the dashboard, verify stable cluster startup, supported speed/RPM and vehicle information, warning indicators, cluster communication, the retained-mainboard connection and physical trim fit. Product-specific CarPlay or map-sync behavior should only be checked against the confirmed configuration.
Informações sobre a condução
Check the supported speed and RPM display, fuel and temperature values, gear position and door status for the matched configuration.
Informações de aviso
Confirm that supported warning indicators appear normally and that no unexplained cluster communication fault remains.
Physical fit
Check that the cluster and trim sit correctly and that the wiring is not being compressed as panels are returned to position.
Product-specific display functions
Navigation or CarPlay map display should only be judged against the function route confirmed for the purchased product version.
Why does long-term support matter for a VW Touareg 7L 2003–2010 digital cluster?
Resposta direta: long-term support matters because this Touareg retrofit combines a new digital display with a specific harness route and the retained original instrument mainboard. If a later problem appears, the original order, hardware version and wiring route can be needed to identify the correct software, part or repair path.
The current Touareg product page states that iKAGOO keeps long-term after-sales support connected to the original order for software guidance, parts support and repair coordination, alongside a 12-month hardware warranty. That distinction matters: the warranty has a defined coverage period, while the value of keeping a traceable product/support record can continue after installation.
This is one reason the purchase decision should not be based only on the lowest first-day price. A digital cluster may stay in the vehicle for years; having the seller able to identify the supplied route later can reduce the risk of buying incompatible replacement parts or troubleshooting the wrong version.
Is this VW Touareg 7L 2003–2010 digital cluster upgrade suitable for my car?
Is a digital cluster upgrade worth it on a VW Touareg 7L?
The installation evidence shows how the upgrade is performed, not that every owner needs it. The strongest upgrade case is an owner who genuinely wants the digital-cockpit change and plans to keep the vehicle. A Touareg-specific percentage is not invented here while the underlying product-page metric is still being corrected.
Will this iKAGOO digital cluster fit my VW Touareg 7L?
Compatibility is checked against the original cluster shape, dashboard opening, platform/configuration, steering position and any previous modifications. The year range is a product scope, not a substitute for that check.
Can I install this VW Touareg 7L digital cluster myself?
L3 · Advanced DIY. The route removes the cluster and multiple trim sections, routes an extension cable and retains/transfers an original electronic board. That is beyond a simple accessory installation.
When should I stop the installation instead of continuing?
Stop when the connector does not match, the cluster opening differs materially from the documented route, the required original board cannot be retained correctly, or final critical driving information is not behaving normally.
VW Touareg 7L 2003–2010 Digital Cluster Installation FAQ
Is the VW Touareg 7L digital cluster plug-and-play?
Not in the sense of “remove one plug and the job is finished.” This iKAGOO route uses matched connectors, but the real installation also removes dashboard trim and brackets, mounts the new cluster, routes an extension cable and retains the original instrument mainboard. It is better treated as a vehicle-specific retrofit than a simple accessory swap.
Will this digital cluster fit every VW Touareg 7L 2003–2010?
No universal fitment claim should be made from the year alone. The original cluster shape, dashboard opening, left- or right-hand-drive layout, market/configuration and previous dashboard or wiring modifications should be checked before shipment. If the opening in Step 13 does not match the documented route, stop before forcing the new cluster into place.
Does a VW Touareg 7L digital cluster installation require coding or VCDS?
The iKAGOO photo source used for this guide does not show a coding step, so this article does not claim that coding is always required or never required. Touareg owners frequently ask about coding when replacing OEM clusters, but this aftermarket route is different because it retains the original instrument mainboard. Confirm the exact supplied configuration if coding or parameter setup is relevant to your vehicle.
Do I need to program the immobilizer or re-adapt the keys?
The documented iKAGOO installation does not show a key or immobilizer adaptation procedure. Do not automatically apply instructions for swapping a complete used OEM Touareg cluster to this retrofit, because the photographed route retains the original instrument mainboard. If your vehicle or supplied version needs any additional adaptation, that should be confirmed before installation.
Will my original mileage stay the same after the digital cluster retrofit?
The installation photos do not prove the mileage-handling behavior, so this guide does not promise a universal result. Because mileage questions are common on Touareg cluster replacements, ask iKAGOO to confirm the mileage/display route for the exact supplied version before ordering if this is critical to you.
Why does this Touareg digital cluster keep the original instrument mainboard?
Because that is the actual route shown in the iKAGOO installation source. Steps 24–31 open the original cluster, retain its mainboard and secure it to a metal support. It is not treated as discarded hardware.
Where is the original Touareg instrument mainboard placed after installation?
In this documented route, the retained original mainboard is reconnected and positioned in the passenger-side glovebox area. Steps 32–36 show the passenger trim and glovebox being opened, the board wiring being connected and the board remaining in that area.
Will speed, RPM, fuel level and warning lights still work?
Those are core acceptance checks, not features to assume blindly. Before the dashboard is fully closed, verify the supported speed/RPM, fuel/temperature, gear or door information where applicable, warning indicators and cluster communication for the matched vehicle configuration. If critical information is missing or a new unexplained warning remains, the installation should not be treated as complete.
Will CarPlay maps appear on the Touareg digital cluster?
The iKAGOO Touareg product is sold with a CarPlay map-sync route, but the exact display path depends on the matched hardware/controller configuration. CarPlay working on another screen in the vehicle does not by itself prove that navigation will appear in the cluster, so this function should be confirmed against the ordered version.
Can I install the VW Touareg 7L digital cluster myself?
Experienced DIY installers may be able to complete it, but this is not a beginner trim-only job. The real route opens the original cluster, handles the original mainboard, routes wiring across the dashboard and relocates that board to the glovebox area. iKAGOO classifies this type of work as Level 3 Advanced DIY; professional installation is the safer choice if you have not worked on instrument clusters before.
What should I check if the cluster is black, restarts or shows new warning lights?
Keep the dashboard accessible and first document the symptom. Check the main cluster connector, thin plug, extension-cable route and retained-mainboard connection against the installation photos. Send iKAGOO the order number, vehicle details, connector photos and a short fault video before changing unrelated parts or forcing another configuration.
Where can I buy this VW Touareg 7L 2003–2010 digital cluster?
Resposta direta: the same iKAGOO VW Touareg 7L 2003–2010 digital cluster is available from the linked product page. If the original cluster shape, steering position, dashboard opening or required CarPlay/map route has not already been confirmed, submit the vehicle photos for compatibility review before ordering.





Add comment
Tem de iniciar a sessão para publicar um comentário.